Almond Macaroon Cookies, Two Ways

Chocolate Almond Macaroon Cookies

Ingredients:

  • 3 ounces chocolate, melted and cooled
  • 1 cup ground almonds (I use Trader Joe’s Almond Meal but you can grind your own using blanched almonds)
  • 2/3 cup sugar
  • 2 egg whites

Directions:

  1. Preheat oven to 325° F.  Line a baking sheet with parchment paper and set aside.
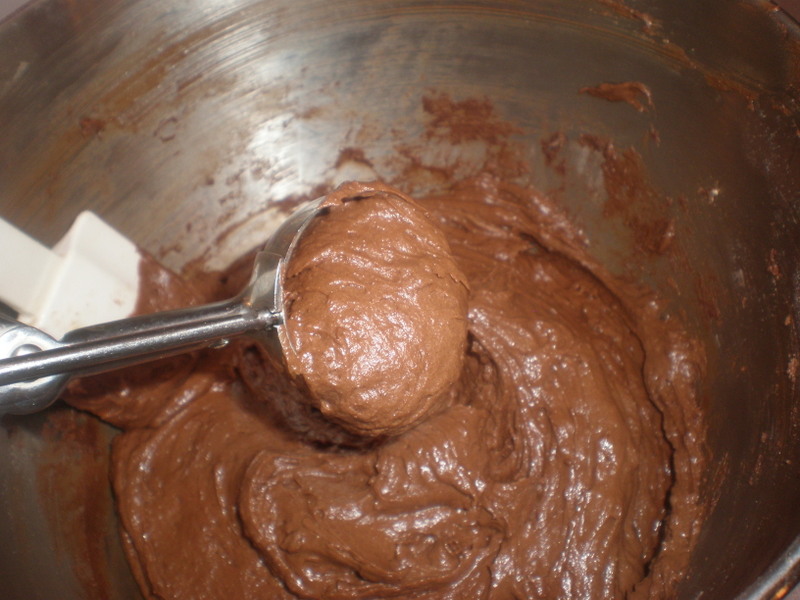
  2. Mix together the almonds and the sugar, then mix in the egg whites.  Next, gradually add the cooled chocolate, stirring until mixture is smooth.
  3. Make twelve 1-inch balls of batter and place them on the baking sheet. Or you can use a medium cookie scoop and drop them onto the baking sheet if you prefer.  Flatten them slightly, so they have a smooth round shape.
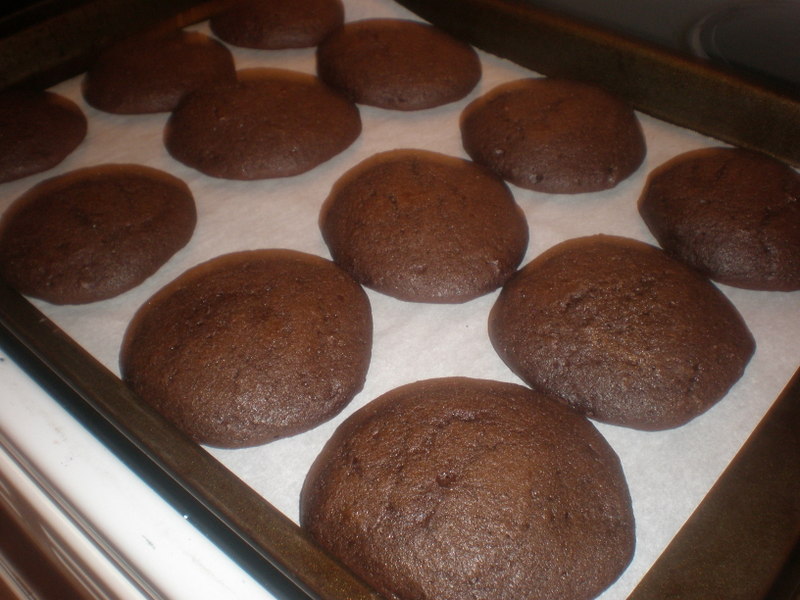
  4. Bake for 12-14 minutes. Remove macaroons from the oven and cool on a rack. When completely cool gently peel them from the parchment paper and enjoy!

Simple Almond Macaroon Cookies

Ingredients:

  • 2 cups ground almonds (Trader Joe’s Almond Meal works great or you can grind your own using blanched almonds)
  • ¾ cup sugar
  • 1/4 teaspoon almond extract
  • 2 egg whites

Directions:

    1. Preheat oven to 425°F.  Line a baking sheet with parchment paper and set aside.
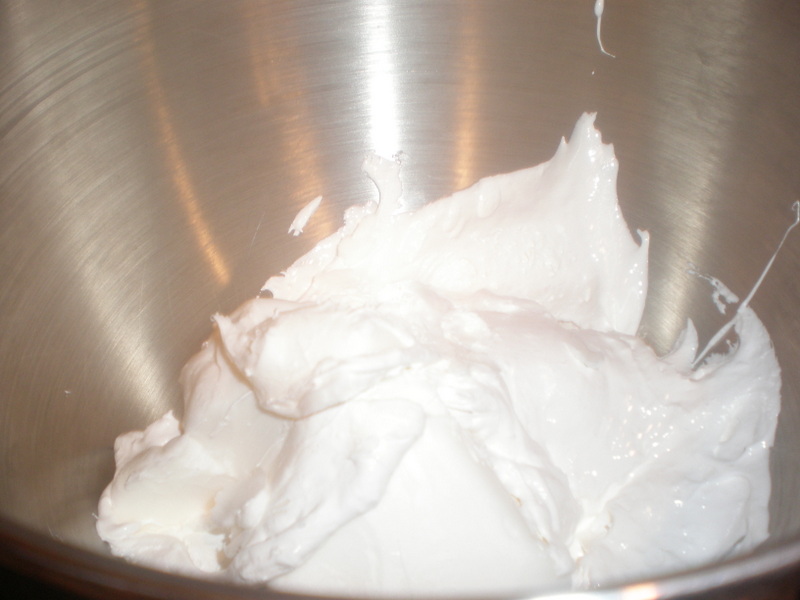
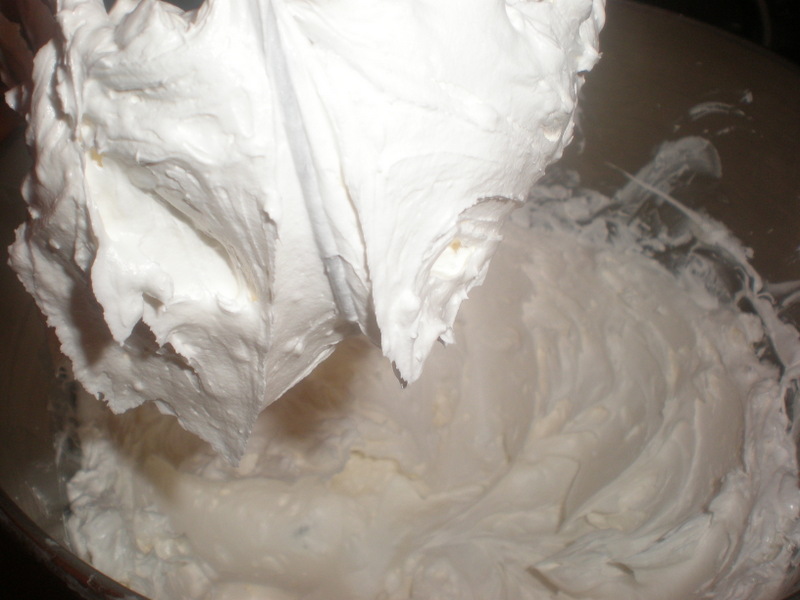
    2. Mix the almonds with the sugar and extract.
    3. Add the egg white and and work the mixture very well holds together in a stiff paste.
    4. Make twelve 1 1/2-inch balls of dough and flatten them slightly, or you can use a medium cookie scoop and drop the batter onto the parchment paper.
    5. Bake for 8-10 minutes, until very lightly colored.  They will be soft, but they will harden as they cool.  Leave on tray until firm before removing from parchment paper.


Continue reading

Salted Chocolate Caramel Tart with Almond Macaroon Crust

Salted Chocolate Caramel Tart with Almond Macaroon Crust

For the crust:

  • 2 cups almond meal ( I get it at Trader Joe’s but you can grind your own)
  • ¾ cup sugar
  • ¼ teaspoon vanilla extract
  • 1 egg white

For the caramel:

  • 1 cup sugar
  • 6 tablespoons butter
  • 6 tablespoons heavy cream
  • 1 teaspoon vanilla extract
  • ½ teaspoon salt

For the chocolate:

  • 6 ounces bittersweet chocolate
  • 1 tablespoon unsalted butter
  • ½ cup heavy cream
  • 1 tablespoon sugar
  • Pinch of salt
  • Flaky sea salt for sprinkling on top 

To make the crust:

  1. Preheat oven to 425° F. Generously butter a 9-inch tart pan and set aside.
  2. In a medium bowl, mix together the almond meal, sugar, vanilla, and egg white.
  3. Spoon it into the prepared pan and gently press it into the bottom and up the sides. Bake for 10 minutes and let cool on a rack. While crust is cooling, make the caramel.

To make the caramel:

  1. In a medium-sized saucepan, heat the sugar on medium-high heat. Stir constantly with a heat-proof rubber spatula until the sugar melts. Caution: melted sugar is very hot! Once you have started to melt the sugar do not stick your finger in or lick the spoon to taste—you will get burned!
  2. Heat the sugar until it turns a golden caramel color. If you have an insta-read or candy thermometer it will be ready at 350F. If you don’t have one, just go by the color. But be careful—the caramel will go past that point very quickly and burn fast. Remove it from the heat as soon as it turns to caramel—it will continue to cook even after removed from the heat.
  3. Add the butter and whisk until butter is fully incorporated. The caramel may bubble up as you to do this.
  4. Add the cream and whisk until the caramel becomes smooth. Add the vanilla and salt and whisk again.
  5. Let cool slightly and pour into the macaroon crust to completely coat the bottom. Now you are ready to make the chocolate glaze.

To make the chocolate glaze:

  1. Put all chocolate glaze ingredients into a bowl and microwave for one minute. Let stand for a minute or two and then stir until smooth.
  2. Pour the chocolate glaze over the caramel filling and lightly sprinkle with flaky sea salt. Let chill in the fridge until firm about two hours, but take out and leave at room temperature after that.

Continue reading

Lemon Tart with Coconut Macaroon Crust

This one speaks for itself!

Lemon Tart with Coconut Macaroon Crust

For the crust:

  • 3 ½ cups sweetened coconut
  • 3 large egg whites
  • ¾ teaspoon vanilla extract

For the filling:

  • 4 large egg yolks
  • 1-14 ounce can sweetened condensed milk
  • ½ teaspoon vanilla extract
  • 2 large lemons, juiced (1/2 cup) and zested

To make the crust:

  1. Preheat oven to 375°F. Generously butter a 9-inch tart pan. In a medium bowl mix together the coconut, egg whites, and vanilla extract. Lightly press mixture against the bottom and sides of the tart pan to form the walls of the crust.
  2. Bake for 10-15 minutes until the crust is lightly golden. Remove from oven and let cool on a rack while you make the filling. Lower oven temp to 325°F.

To make the filling:

  1. In a medium bowl whisk together the egg yolks, sweetened condensed milk, vanilla extract, lemon juice, and lemon zest. Pour the filling into the cooled shell and bake until just set 15-20 minutes. Set on a rack to cool, then refrigerate until chilled.

Continue reading

Matzah Ball Soup with Herbes de Provence Mini-Matzah Balls

“Of soup and love, the first is best.” ~Old Spanish proverb

I have to confess, I don’t have a family recipe for chicken soup. Nothing has been handed down from generation to generation. No one carried a recipe over to Ellis Island sown into the lining of their coat.

Not my actual family

Not my actual family

There wasn’t a magic formula with my name on it either. Until now.

Matzah ball soup with the works

Matzah ball soup with the works

I did have my grandma Esther’s knedelaich recipe, in her handwriting too! But one day I was reading the recipe and measuring the matzah meal from the box, and noticed that her recipe was THE SAME EXACT ONE AS ON THE BOX!!! Well, either she was a trendsetter, or she got it from there as well. So much for my family recipe!

Grandma's recipe on the back

Grandma’s recipe on the back

There are many different permutations for matzah balls, light and fluffy, egg white only, ginger and almond, baking soda and seltzer. Well my friends, you could use ol’reliable on the side of the box of matzah meal, or you can use this recipe for matzah balls seasoned with Herbes de Provence which I make for special occasions. If you aren’t keen on something so adventurous (it is pretty subtle, really), then just leave out the herbs and you will have a light yolk-free matzah ball.

Herbs de Provence

Herbs de Provence

Continue reading

Keen on Quinoa

Before quinoa became popular, my mother had it in her pantry when I was growing up. Back in the ‘70’s, it was hippie dippy health food and had a picture of a Native American on the box to show how natural it was. I am sure my mother made it once, and it was either tolerated at one weeknight dinner, or rejected entirely, and then left for dead on the shelf, in memory of mom’s attempt to try something new.

But now it has made a re-appearance in grocery stores, and healthful minded people are turning to it for a low-carb, gluten-free substitute for other grains. Understanding what it is and how to cook it can keep its popularity stats up at your dinner table.

First thing you should know is that it is not a grain, although it looks a lot like couscous.

Uncooked quinoa

Uncooked quinoa

My husband thinks it looks a lot like bird seed and jokes that we are sharing dinner with our pet parakeet.

Bird seed

Bird seed

Our parakeet, Happy Love

Our parakeet, Happy Love

Quinoa is related to beets and spinach and is high in protein and iron. It is the seed of its plant, and, if you look closely at it after it is cooked, has a lot of personality—it is curly, just like me!

Curly when cooked!

Curly when cooked!

It is also accepted as kosher for Passover—just think, it is the only kosher food that has a curly tail!

Curly close-up

Curly close-up

During Passover I leave a big bowl of it in the fridge, and it will save me from sobbing into my matzah on day 3 of the holiday because I can’t go one more day without my beloved couscous, rice, or pasta (carboholic in the house, yo).

Continue reading

Slow & Low Kale Chips

“Slow and low that is the tempo.” ~ Beastie Boys

By gollly, I’ve done it! After many misleading tips on the interent (who woulda thunk!), I have finally cracked the kale chip code.

It is not like roasting other vegetables. It is its own thing entirely.

More like meringues (well, only sort of), it is a drying out process of properly spaced items on a baking sheet.

To make a lot, two bunches of kale, about 8 ounces each will do it. My local grocery store has curly kale for 99 cents per pound. It also carries organic dino kale, which I love, for $5.98 per pound! It doesn’t seem fair, but it is what it is. I went with the more affordable option for today.

Remove the kale from the stem and rip it into little bite sized pieces. Wash it well, and spin it in your salad spinner to remove excess water.

Wash

Wash

Into the salad spinner

Into the salad spinner

Spin dry

Spin dry

Lay it on clean kitchen towels or paper towels to air dry completely.

Air dry

Air dry

You can store the washed and dried kale in Ziploc bags in the fridge for a few days. Or, if you are ready to cook ‘em, then do so now.

Preheat the oven to 275°F. Line 2 half sheet sized baking trays with foil. Place the kale on the trays. Drizzle each tray with 2 tablespoons extra virgin olive oil and sprinkle with course sea salt. You don’t need much, just a little to give the chips some flavor and offset some of the pleasant bitterness of the kale. Toss with clean hands and then make sure the kale pieces are scattered about on the tray in a single layer with space between them.

Place the kale on the tray

Place the kale on the tray

Two trays full

Two trays full

Add oil, salt, toss, and spread

Add oil, salt, toss, and spread

Bake them, one tray at a time (I have a double oven so can do two at once) for a total of 30 minutes, stirring halfway.

Let cool on tray for a few minutes and pour them into a serving bowl.

Cooling

Cooling

Taste for salt and devour!

Start snacking!

Start snacking!

Any leftovers can be stored in a sealed container in the fridge and snacked upon as necessary. If you need to crisp them up you can just put them back in a low oven for a few minutes.

Slow & Low Kale Chips

  • 2 bunches kale, any kind, about 8 ounces each
  • 4 tablespoons extra-virgin olive oil
  • Course sea salt
  1. Remove the stems and discard. Tear the leaves into bite-sized pieces. Wash and dry very well, leaving out to air dry on kitchen towels or paper towels if you must.
  2. Preheat oven to 275°F. Line 2 baking sheets with foil. Divide the kale between them and drizzle each batch with 2 tablespoons of the olive oil and sprinkle with a little of the sea salt.
  3. Bake for 30 minutes, stirring halfway. Let cool for a few minutes on baking sheet and then taste for salt and serve.

    Slow & Low Kale Chips

    Slow & Low Kale Chips

Hard-Boiled Eggs: You’re Doing it Wrong

I like to help (queue theme from Superman). And I’m here to save you. 🙂

I’m guessing that 9 out of 10 of you have never had a properly hard -boiled egg. I know this is true because until recently, neither had I.

I thought I had, but then as I was watching Food Network, I noticed that Nigella’s eggs did not look like mine. Her yolks were gloriously golden. Mine were yellow. And I thought that was what they were supposed to be.

Wrong.

With Passover and Easter right around the corner, now is the time to set things straight this Spring, as they are officially the “hard-boiled holidays.”

If you find yourself choking down chalky green-tinged egg yolks and rubbery whites, or cursing out loud in front of the kids as you struggle to peel a hard-boiled egg and gouge out chunks of it as you go, or you are just unsure of when your eggs are done, then keep reading folks!

Continue reading

Whoopie Pies: Whoop! Here it is!

If you haven’t noticed, I have a lot of opinions about food. My opinion about Whoopie Pie is, that it is good. But these, my friends, are great!

Whoopie pie!

Whoopie pie!

These can be made hamburger-sized, bun and all, but you can make them smaller if you are into mini things. Part of their charm, if you ask me, is the size, and are not necessarily meant to be delicate. But do as you will.

I say make them big and eat one for lunch.

Lunch is served

Lunch is served

The soft, moist, fluffy chocolate cake will stick to your fingers, reminiscent of the cream filled snack cake in little plastic packages from your childhood, but fresh and homemade.

Chocolatey good

Chocolatey good

The cream is somehow very un-marshmallow-like and more the stuff that dreams are made of, if one were to dream about cream-filled dessert.

I do…

Dreamy

Dreamy

They are just about foolproof, so go ahead and mis-measure a little, sift or not, substitute here and there–it is entirely up to you.

The only few things I will insist upon, is that you must use vegetable shortening & butter when specified to get the proper texture of cake and cream; and it is the Marshamallow  Fluff  brand I recommend since both the brand and the dessert are classics.

This is the shtuff

This is the shtuff

So experience a little high, and get it on with these Whoopie Pies.

Classic Whoopie Pies

For the chocolate cake:

  • 1 2/3 cups all-purpose flour
  • 2/3 cup unsweetened cocoa powder
  • 1 ½ teaspoons baking soda
  • ½ teaspoon salt
  • 4 tablespoons unsalted butter, at room temperature
  • 4 tablespoons vegetable shortening
  • 1 cup packed dark brown sugar
  • 1 large egg
  • 1 teaspoon vanilla extract
  • 1 cup milk
  1. Position a rack in the center of the oven and preheat to 375°F. Line two baking sheets with parchment paper and set aside.
  2. Sift together the flour, cocoa powder, baking soda, and salt onto a sheet of wax paper.
  3. Into the bowl of a stand mixer fitted with the paddle attachment (yes, you can just use a hand-held mixer instead), beat together the butter, shortening, and brown sugar on low speed until just combined. Increase the speed to medium and beat until fluffy and smooth, about 3 minutes. Add the egg and vanilla and beat for another 2 minutes.
  4. Add half of the flour mixture and half of the milk mixture to the batter and beat on low until just incorporated, scraping down the sides of the bowl. Add the remaining flour mixture and the rest of the milk and beat until completely combined.
  5. Using a cookie scoop (sm, med, or lg), drop batter onto one of the prepared baking sheets, spacing them at least 2 inches apart (1 Tablespoon for 2” cakes, 2 T for 3”, and 3 T for 4”).
  6. Bake one sheet at a time for about 10 minutes each, or until the cakes spring back when pressed gently. Remove from the oven and let the cakes cool on the sheet for about 5 minutes before transferring them to a rack to cool completely.

Makes about 48 two-inch cakes which will make 24 Whoopie Pies, or 36 three-inch cakes which will make 18 W.P.’s., or like I did, 24 four-inch cakes for 12 hamburger sized W.P.’s!

For the marshmallow filling:

  • 1 ½ cups Marshmallow Fluff
  • 1 ¼ cups vegetable shortening
  • 1 cup confectioners’ sugar
  • 1 tablespoon vanilla extract
  1. In the bowl of a stand mixer fitted with the paddle attachment, beat together the Marshmallow Fluff and the vegetable shortening, starting on low and increasing the medium speed until the mixture is smooth and fluffy, about 3 minutes. Reduce mixer speed to low, add the confectioners’ sugar and the vanilla, and beat until thoroughly incorporated. Increase mixer speed to medium and beat until fluffy, about 3 minutes more.

To assemble:

  1. Using a cookie scoop or a spoon put a large dollop in the center of half of the cookies. Top with another cookie and gently press down to help the cream spread. Eat right away or store between sheets of wax paper in a sealed container large enough to fit the Whoopie Pies.
Flour

Flour

Cocoa

Cocoa

The sifter

The sifter

Adding cocoa to the flour

Adding cocoa to the flour

Ready to sift

Ready to sift

Sifting in progress

Sifting in progress

Done sifting

Done sifting

Ready to cream butter and sugar

Ready to cream butter and sugar

Creaming

Creaming

Vanilla

Vanilla

An egg

An egg

Mixin' it up

Mixin’ it up

Add egg and vanilla

Add egg and vanilla

Add half the milk

Add half the milk

Add half the flour mixture

Add half the flour mixture

Batter mixing

Batter mixing

Almost done

Almost done

Scrape down the sides

Scrape down the sides

Beautiful batter

Beautiful batter

Get the scoop

Get the scoop

Drop it

Drop it

Ready to bake

Ready to bake

All lined up

All lined up

Transformed

Transformed

Chocolatey good

Chocolatey good

All fluf

All fluf

Whip it

Whip it

Add vanilla

Add vanilla

Dreamy

Dreamy

A scoop

A scoop

Filling in place

Filling in place

Beginning to look like dessert

Beginning to look like dessert

Yum

Yum

Lookin' good

Lookin’ good

mmm...

mmm…

The topper

The topper

Whoopie pie!

Whoopie pie!

A small army of dessert

A small army of dessert

Heavenly

Heavenly

Whoopie!

Whoopie!

Yum

Yum

Lunch is served

Lunch is served

Happiness

Happiness